Pick out a child to select either one of the AM or PM hour spaces, from the Ante or Post Meridiem Time Blocks below.
Pick out a second child to select one of the Portion segments of the day, from the Portions of a day, Time Blocks below.
Pick out a third child to select one of the HOUR spaces , from the Hours of each day, Time Blocks below
Finally, pick out a child to represent the following hour, that will come after the hours space, that child number 3 has selected.
Child no. 1 selects: AM
Child no. 2 selects: Morning – Night-Time
Child no. 3 selects: Mthe 3-hour space. (Start time)
Child no. 4 selects: the following 4-hour space (End Time)

So, the time begins at: 3:00AM in the morning, during the night. Ask your students, what might they be doing at 3:00AM and 4:00AM in the morning, during the night. Practice this activity with your children to familiarize them with AM and PM’s 24 hours.
The online analog time tools for this lesson are on individual slides, showing enlarged images of each hour and events relative to the time of day. The class will need to use our 60-minute charts to count off 60 minutes, until they reach the next hour space.
After thoroughly reviewing the AM and PM’s 24 hours, with your children, take a moment to ask them what they are doing during any random portion of a day, that you choose to select.
Pick out a child to be the minute leader and have he or she select any random number between 1 minute and 60 minutes.
PLet the class count off, out loud, one minute at a time, starting with 1-minute and let them continue counting, until they reach the number of minutes selected by the minute leader
The minute leader selects 2 minutes
The class will start counting the minutes one minute at a time,
until they reach 2 minutes, by counting: 1 minute, 2 minutes.
Repeat this activity to allow other children to be the minute leader.
Also, have your students practice counting to 60-minutes. Let them know that 60-minutes equals one hour; and once the BIG minute hand reaches 60 minutes, the time will reach the next hour space.
Autoplay – this function slowly points out 60 minutes, one digit at a time.
Manual – this function will allow you to guide your students through each minute at your own pace.
GO TO SLIDE – this function will allow you to start or stop counting at any selected numbers.
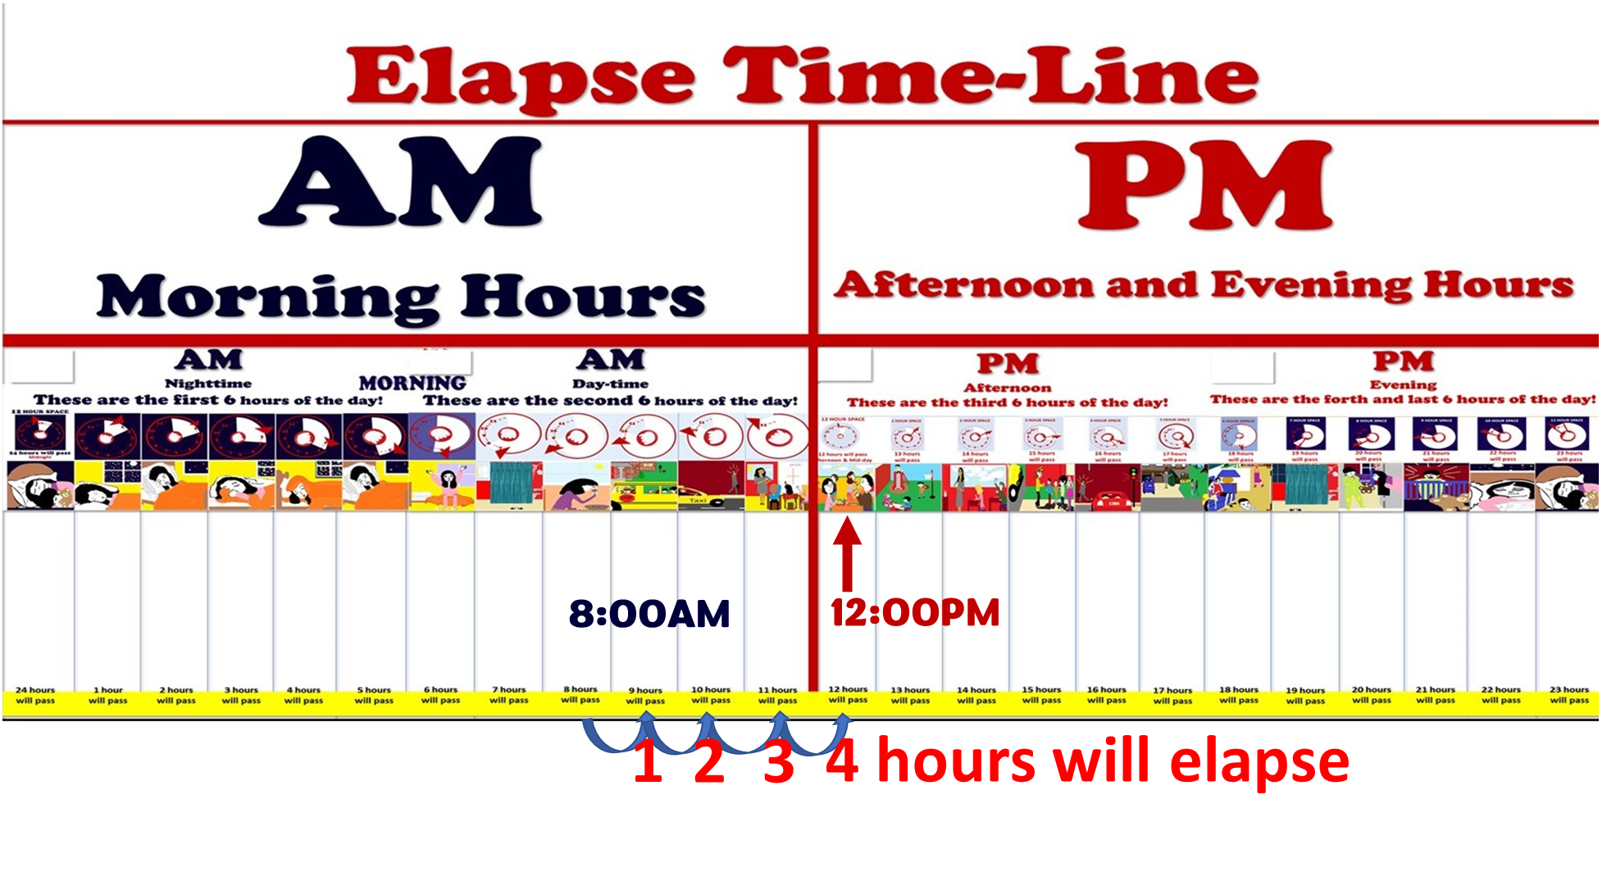
Elapsed time tools are designed to give children a visual model of what a day looks like, when aligned side-by-side, making it easy to count the number of elapsed hours.
Pick a child to select a STARTING point from one of the 12- AM morning hours between:
Pick another child to select an END point from one of the 12- PM afternoon or evening hours between:
Child number 1 selects: : 8:00 AM morning day-time hour space
Child number 2 selects: 12:00 PM afternoon, day-time hour space
Use the WIttles Worth Elapsed Timeline Charts to find out how many hours will elapse.
The slides are organized and separated into:
AM and PM time frames.
Break down a 24-hour day
Show the difference between AM morning hours and PM afternoon and evening hours
Show realistic events that relate to time points in 33 colorful slides
Point out in detail the specific purpose of each analog clock hand tools
Demonstrate what a 60-Minute Interval looks like
Show the children how to count from any random selection from which to starting point of an event to the end point, using the AM and PM Elapsed Timeline, which will make it easy to visualize elapsed hours.
Use these slides to help your children learn the responsibility of the Little Hand’s AM morning HOURS
Use these slides to allow your children see what AM hours looks like.
Use slides 2-17 to help your children study AM’s night-time morning hours and day-time morning hours
Use these slides to teach your children how to associates time with their daily events
Use these slides to teach your children AM’s12-hour cycle, and that the AM hours are the first 12 hours of each day
Use each colorful slide and illustration to help make reading the AM morning hours easy to classify
Use slide18 to teach your children when the AM morning hours transitions to PM afternoon and evening hours
Use these slides to help your children learn the responsibility of the Little Hand’s PM afternoon and evening hours
Use these slides to allow your children see what PM hours looks like
Use slides 18-32 to help your children study PM’s afternoon and evening hours
Use these slides to teach your children PM’s12-hour cycle, and that the PM hours covers the last 12 hours of each day
Use each colorful slide and illustration to help make reading the PM afternoon and evening hours easy to classify
Use slide 33 to teach your children when PMafternoon and evening hours transitions back to the AM morning-nighttime hours
Use these slides to show your children the big hand’s responsibility, which is to point out each number of minutes from 1 to 60, and to move time forward from one hour to the next.
Use these slides to help your children practice counting one minute at a time
Use these slides to help your children see how to arrive at 5 past, quarter past, half past, and other time interval you choose to select
Use these slides to help your children practice counting 60 minutes, along with the audio 60 minutes counting tool.
Use these slides to show your children what a day look like, and how to understand hourly recognition
Use these slides to help your children plan their day from start to finish using our Elapse the Time charts
Use these slides to help children study what a full day looks like
Teacher’s Instructions Tip Sheets: Step by Step instructions regarding analog time teaching tools:
With Wittles Worth Analog Time Tools can be used to help you teach and children to learn number sequences and how to recognize and understand the function of the little hour hand and 24 hours, the big hand and 60 minutes, and ultimately, they will learn the concept of analog time.